Create an App with Dropwizard, Maven and Kotlin
In this post, I am going to show you how to create a simple Dropwizard app.
This is going to be a technical tutorial.
At the end of this tutorial, your app will expose a RESTful API.
The code is written in Kotlin, but you can do the same with Java.
I will start with a short explanation about Dropwizard and Maven.
Dropwizard
Dropwizard is a light Java framework for building RESTful web services.
Dropwizard collects together stable libraries, such as Jersey, Jackson, and JDBI, into a lightweight package.
Maven
Maven is a build automation and management tool for Java.
With Maven, it is easy to define the building of the software and the dependencies.
POM is an XML file that describes a Maven project and its dependencies.
Maven in Yiddish is “person with understanding, expert”. This is the origin of the name for this tool.
Creating a new project
I will use IntelliJ Community Edition IDE in this tutorial.
Click on File –> New –> Project –> Maven
You are going to see the following screen:
 Click on “Next”. Now you are ready to define the POM file.
Defining the POM file
As I described at the beginning of the tutorial, we have to define the dependencies of the project in the POM.xml file.
Let’s do it together.
Properties
In the properties tag, define the version of Dropwizard and Kotlin you want to use.
You can also define Kotlin compiler configurations through properties.
In this case, I defined languageVersion (you want to ensure source compatibility with the specified version of Kotlin) and jvmTarget (the target version of the generated JVM bytecode).
<properties>
	<dropwizard.version>2.0.13</dropwizard.version>
	<kotlin.version>1.4.10</kotlin.version>
	<kotlin.compiler.languageVersion>1.4</kotlin.compiler.languageVersion>
	<kotlin.compiler.jvmTarget>1.8</kotlin.compiler.jvmTarget>
</properties>
Dependencies
Your project needs dependencies in order to compile, build, run and test.
In the dependencies tag, we will define dropwizard-core and kotlin-stdlib-jdk8
<dependencies>
	<dependency>
		<groupId>io.dropwizard</groupId>
		<artifactId>dropwizard-core</artifactId>
		<version>${dropwizard.version}</version>
	</dependency>

	<dependency>
		<groupId>org.jetbrains.kotlin</groupId>
		<artifactId>kotlin-stdlib-jdk8</artifactId>
		<version>${kotlin.version}</version>
	</dependency>
</dependencies>
Broadly speaking, dropwizard-core module includes:
- Jetty - HTTP server.
- Jersey - RESTful web framework.
- Jackson - JSON library for the JVM.
- Metrics - library for application metrics.
Compilation
First, we will specify the source directories in <sourceDirectory> and in <testSourceDirectory> in order to compile the source code.
The
<build>
	<sourceDirectory>${project.basedir}/src/main/kotlin</sourceDirectory>
	<testSourceDirectory>${project.basedir}/src/test/kotlin</testSourceDirectory>
	<plugins>
		<plugin>
			<artifactId>kotlin-maven-plugin</artifactId>
			<groupId>org.jetbrains.kotlin</groupId>
			<version>${kotlin.version}</version>
			<executions>
				<execution>
					<id>compile</id>
					<goals>
						<goal>compile</goal>
					</goals>
				</execution>
				<execution>
					<id>test-compile</id>
					<goals>
						<goal>test-compile</goal>
					</goals>
				</execution>
			</executions>
		</plugin>
	</plugins>
</build>
Project structure and configuration file
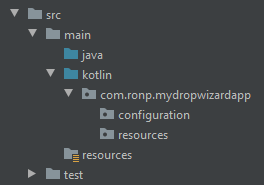
Here is my project structure, and you can create the same structure.

We can define parameters in YAML configuration file which is deserialized to an instance of our configuration class.
Let’s create both of them. Create my-app-config.yml in src/main/resources and add one parameter to this file as follow:
configTest: Ron
Now, we define our configuration class, which extends the Dropwizard Configuration class.
Create MyAppConfig.kt in the configuration package. Here is the code:
package com.ronp.mydropwizardapp.configuration

import com.fasterxml.jackson.annotation.JsonProperty
import io.dropwizard.Configuration


class MyAppConfig(@JsonProperty("configTest") val configTest: String): Configuration()
We use the JsonProperty to allow Jackson to deserialize the properties (in our case, configTest) from a YAML file to our application’s Configuration instance.
Creating an Application class
To run an instance of our Dropwizard RESTful server, we have to implement our Application class.
Create a new MyApp class in mydropwizardapp and implement as follows:
package com.ronp.mydropwizardapp

import com.ronp.mydropwizardapp.configuration.MyAppConfig
import com.ronp.mydropwizardapp.resources.HelloWorldResource
import io.dropwizard.Application
import io.dropwizard.setup.Environment

class MyApp: Application<MyAppConfig>() {
    companion object {
        @JvmStatic fun main(args: Array<String>) = MyApp().run(*args)
    }

    override fun run(myAppConfig: MyAppConfig, environment: Environment) {
        // we are going to implement this function soon
    }
}
Creating and registering a resource class
Now we can add our first endpoint!
To do that we need to create a new Jersey REST resource.
In mydropwizardapp/resources create a new class - HelloWorldResource.kt
package com.ronp.mydropwizardapp.resources

import javax.ws.rs.GET
import javax.ws.rs.Path

@Path("/helloWorld")
class HelloWorldResource(private val property: String) {
    @GET
    fun helloWorld() = "Hello World $property :)"
}
As you can see, a resource is associated with a URI template, in our case it is “/helloWorld”.
The @Path annotation tells Jersey that this resource is available at the URI “/helloWorld”.
Now, we are ready to complete the MyApp code and register our resource to the application.
In the run method, write the following code in order to register HelloWorldResource.
package com.ronp.mydropwizardapp

import com.ronp.mydropwizardapp.configuration.MyAppConfig
import com.ronp.mydropwizardapp.resources.HelloWorldResource
import io.dropwizard.Application
import io.dropwizard.setup.Environment

class MyApp: Application<MyAppConfig>() {
    companion object {
        @JvmStatic fun main(args: Array<String>) = MyApp().run(*args)
    }

    override fun run(myAppConfig: MyAppConfig, environment: Environment) {
        environment.jersey().register(HelloWorldResource(myAppConfig.configTest))
    }
}
Notice that we are using the configuration YAML and passing the property to the resource (myAppConfig.configTest).
Running the application
We are ready to run our application!
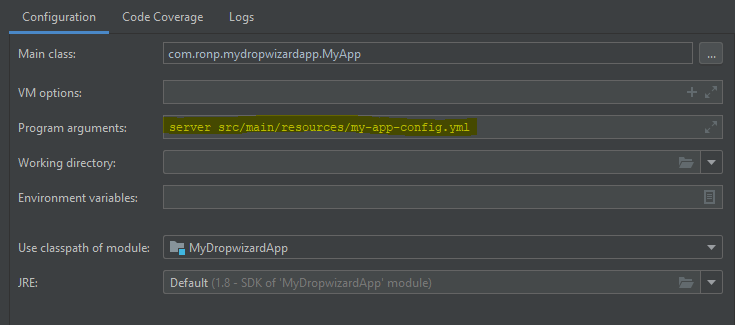
To do that you should edit the “Program arguments” in MyApp running configurations as follows:
It tells the Dropwizard app to run as a server and specify the location of the configuration file.
Now you can click on run:
You should see the following info messages on the run tab:
That means our resource was registered properly as a GET request on /helloWorld path.
That means our app is running on port 8080.
In order to call and test our resource you can write:
curl HTTP://localhost:8080/helloWorld
and you should see the following expected output:
Another option is to open your browser and type http://localhost:8080/helloWorld on the address line.
As you can see, we got the required output, including the config property. Congratulations!


